Applies To: ThreatSync+ NDR
Asset discovery enables ThreatSync+ NDR to quickly and easily identify and learn the critical systems in your network. Every 12 hours, ThreatSync+ NDR inventories your network and observes the application traffic seen on each IP address. It automatically identifies subnets and your important servers and network devices and shows them on the Discover page. It also provides suggestions that enable you to configure new assets and update existing assets to better reflect the activity in your network.
When you first set up ThreatSync+ NDR, it can take two to three days for assets to show in the Discover page. You can also import critical assets from your asset management systems. For information on how to manually add and import devices, go to Manage Devices.
How Discovery Works
Discovery in ThreatSync+ NDR is an automated process that continuously identifies and profiles the assets, behaviors, and communications occurring across your network. It is essentially the visibility engine that feeds ThreatSync+ NDR with the context it needs to detect threats, assess risk, and correlate events.
Discovery in ThreatSync+ NDR works by:
- Continuous network monitoring — ThreatSync+ NDR continuously analyzes north-south (in and out of the network) and east-west (internal lateral movement) network traffic to provide visibility into every device and communication path on the network. This enables identification of all active hosts, mapping of communication patterns, and detection of unusual or unauthorized connections.
- AI-driven analysis of data flows — Advanced AI and machine learning is used to analyze traffic metadata and detect patterns that indicate risk or compromise. This enables recognition of new or unmanaged devices, behavioral baselining for normal vs. abnormal activity, and early detection of emerging threats.
- Asset and role identification — ThreatSync+ NDR identifies critical servers and devices based on the traffic they generate across known ports, enabling asset classification. Results are presented to users for acceptance or rejection.
- Automatic subnet discovery — ThreatSync+ NDR automatically discovers subnets by analyzing network traffic and organizing IP addresses into logical subnet groupings.
Discovery is the foundation for an automated or guided response to a threat or vulnerability. After Discovery identifies assets and behaviors, ThreatSync+ NDR can generate alerts and notify you about policy violations or other unusual activity.
Manage Suggested Assets on the Discover Page
On the Discover page, you can accept discovered devices and subnets to identify them as an important asset in the network. If you ignore an asset, it is hidden from the list, but ThreatSync+ NDR continues to monitor network traffic for the device.
Red circles show the total number of discovered assets — devices and subnets — that need to be accepted or ignored. As you accept or ignore discovered assets, the number in the red circle decreases.
We recommend that you accept discovered assets. The more that ThreatSync+ NDR knows about critical assets in your network, the more effective ThreatSync+ NDR is to alert you to important threats.
To accept or ignore all assets in the table, from WatchGuard Cloud:
- Select Monitor > ThreatSync+.
- Select Discover.
- Select the check box in the header to select all rows.
- In the upper-right corner, click

- Select Accept Selected or Ignore Selected.
If you accept multiple assets, ThreatSync+ NDR automatically provides a default name for the asset based on one of the roles and its IP address.
Accept and Configure Individual Devices
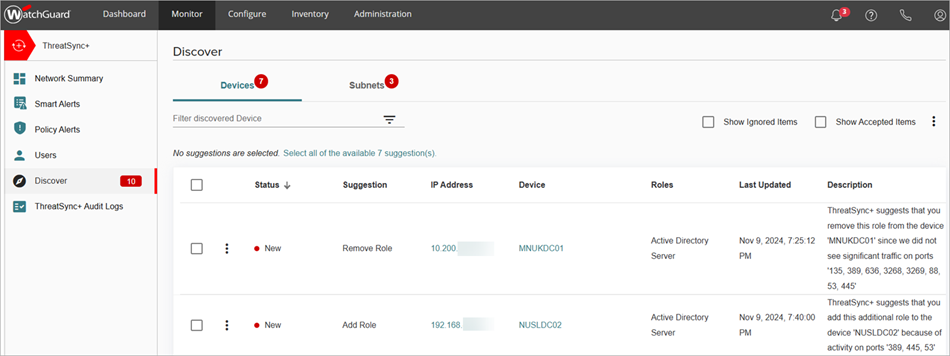
On the Discover page, the Devices tab shows a list of static devices that ThreatSync+ NDR discovered in the network. ThreatSync+ NDR automatically assigns names, roles, and importance to discovered devices. When you accept a discovered device, you can edit the values for the device.
In the Suggestion column, ThreatSync+ NDR also suggests an action to take for the discovered device. The suggestion and recommended action can include:
- Add Device — Accept the device to identify and label it. Traffic was detected that indicated the asset serves an application that represents one or more of the ThreatSync+ NDR pre-defined roles.
- Add Role — Accept the device and add an additional role to an existing asset based on the traffic that ThreatSync+ observed.
- Remove Role — Accept the device and remove an existing role from an existing asset based on the traffic that ThreatSync+ NDR observed.
To view traffic detail for the IP address, click the IP address. For more information, go to Investigate ThreatSync+ Traffic.
To view the device details, click the device name. For more information, go to View Device Details.
To accept or ignore a discovered device, from WatchGuard Cloud:
- Select Monitor > ThreatSync+.
- Select Discover.
- On the Devices tab, click in the row for a discovered device.
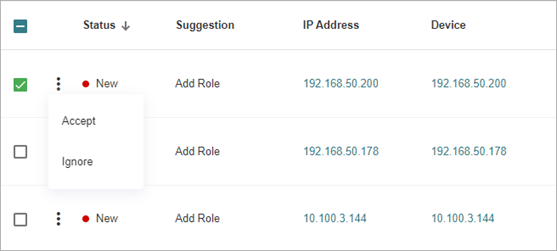
- Select Accept or Ignore.
If you select Ignore, the status changes from New to Ignored. If you select Accept, the Update a Device dialog box opens. Continue to the next step.
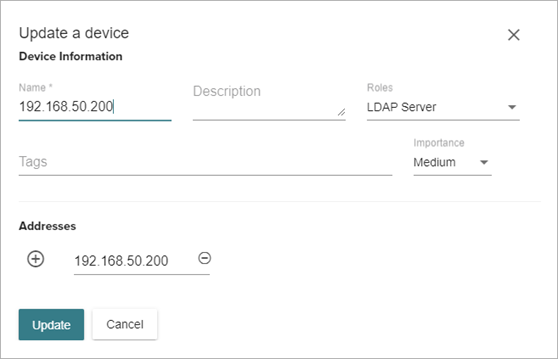
- Edit the device information:
- Name — Enter a device name. The device name is used to show information about this node in violations, Smart Alerts, and traffic. Enter a name that is easy to understand instead of the IP address.
- Description — Enter a description of the device to help identify the device.
- Roles — Select the role that the device serves on the network (for example, SQL database server). The role is used to identify what application services this node provides so that ThreatSync+ can better identify threats.
- Tags — Enter tags to organize the device into groups. Tags help you associate additional identifiers with your nodes so that you can group them and create policies around dynamic sets of systems.
- Importance — Select a rating to indicate how valuable this device is to your organization (from Very Low to Very High). The importance level should reflect the impact to your organization if this device is damaged or lost. This value is used to calculate the risk level of an asset in conjunction with the advanced threat detection of ThreatSync+.
- Addresses — Enter IP addresses for the device. The device might have multiple IP addresses for different network interfaces. Click
 to add more than one IP address.
 - Click Update.
The status changes from New to Accepted. ThreatSync+ adds accepted devices to the managed device list. For more information, go to Manage Devices.
Accept and Configure Discovered Subnets
On the Subnets tab, you can review and accept IP address ranges and subnets discovered by ThreatSync+. This can help you define and label important areas in your internal network.
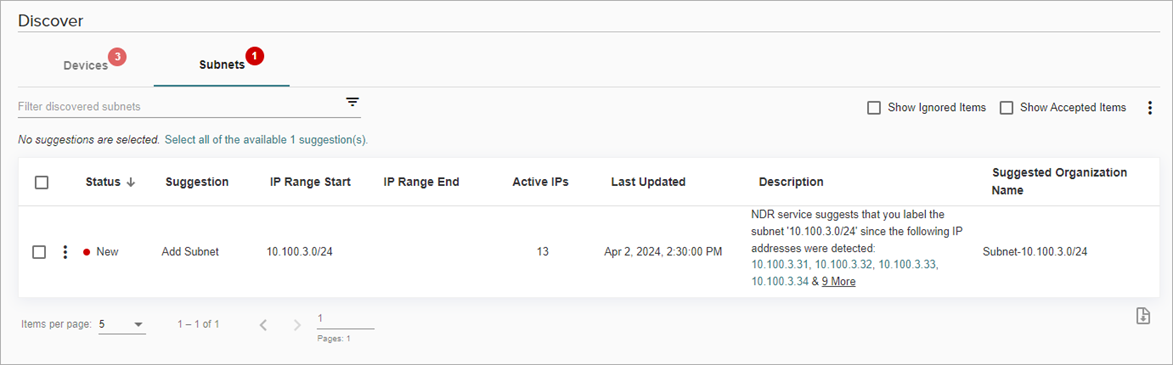
In the Suggestion column, ThreatSync+ also suggests an action to take for the discovered subnet. The suggestion and recommended action can include:
- Add Subnet — Identify and label a new asset because traffic was detected that indicated the asset serves an application that represents one or more ThreatSync+ pre-defined roles.
To accept or ignore discovered subnets, from WatchGuard Cloud:
- Select Monitor > ThreatSync+.
- Select Discover.

- On the Subnets tab, click to in the row for a discovered subnet.
- Select Accept or Ignore.
If you select Ignore, the status changes from New to Ignored. If you select Accept, the Add a Subnet or Address Range dialog box opens. Continue to the next step.

- Edit the assigned values.
- Subnet and Mask (CIDR) — Select this option to identify the subnet and mask.
- IP Range — Select this option to identify the IP address range.
- Start IP — Enter the starting IP address of the range.
- End IP — Enter the ending IP address of the range.
- Organization — Enter a name for the subnet or IP address range.
- Device Type — Select the type of device (for example, a computer, server, or gateway).
- Exclude — Select this check box to exclude the subnet or IP address range from traffic monitoring. For more information, go to Configure Subnets and Organizations.
- Organization Tags — Enter tags to organize subnet into groups. Tags help you associate additional identifiers with your nodes so that you can group them and create policies around dynamic sets of systems.
- Click Save.
The status changes from New to Accepted.
If required, you can edit an accepted subnet or IP address range on the Subnets and Organization page. For more information, go to Configure Subnets and Organizations.
Accept a Previously Ignored Asset
To show and accept an asset that was previously ignored, from WatchGuard Cloud:
- Select Monitor > ThreatSync+.
- Select Discover.
- Select the Show Ignored Items check box in the upper-right corner.

- Select the check box for the ignored asset.
- Click in the upper-right corner.
- Select Show Selected.
The status changes to New. - Click in the row for the asset you want to accept.

- Click Accept.